When you start with pumpfoiling, you will most probably just use the equipment that is provide either by the school where you take a lesson or in case you do the first attempts with your friends, just use their equipment. However, once you get more into pumpfoiling you will look more into the details of the equipment and also one day get confronted with the term “shim” or “shimming”. In this article, we will dig into the topic of shimming and explain what shimming is and how it works.
This article is also available as a video.
To be in the position to explain „shimming“ in the context of foiling, I will start with a quick recap about the lift force, explain the angle of attack, look with you into different backwing assemblies and explain then the effect of adding a shim and what negative and positive shims mean.
Summary and Content
By adding a shim, you are changing the angle of attack of the backwing and with that its lift force. With that you can influence the pitch moment of the foil, which is going along with impact on the glide, stablility and agility on the turns.
Dependent on your setup, you have to be aware to choose the correct shim (either negative or positive) to achieve the desired result.
In this article:
1. Lift Force of a Hydrofoil
2. Function of the Backwing
3. „Shimming“ – Changing the Angle of Attack
4. Impact of Negative and Positive Shims
5. Conclusions
Lift Force of a Hydrofoil
Those of you who already had look at the article „Physics of a Hydrofoil“ should be familiar with the forces acting on a hydrofoil.
On a hydrofoil there are in a simplified way acting four forces:
- The weight force
- Lift force
- Propulsion (thrust force)
- Drag force

Figure 1 – Main forces acting on a foil
To explain the principle of shimming, we will focus on the lift force. The lift force is the force that is lifting foil, respectively is counteracting the weight force, which consists of the weight of the rider as well as the weight of the foiling setup (board, mast, fuselage, front wing, back wing). Thereby, the lift force can be calcualted using the following formula:
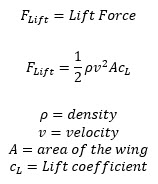
As we can see in the formula, the lift force is dependent on the density of the water, the velocity of the foil against the water, the area of the wing and the so called lift coefficient. Looking at the formula, we can conclude that the lift is increasing in case of..
- higher density of the water
- more speed
- bigger area of the wing
- bigger lift coefficient
As long as you are using the same equipment and go foiling in the same water, you will have the same area of the wing, more or less same density of the water and without changing your foiling style, also the same speed. Therefore, let us now look at the lift coefficient and how the lift coefficient is changing.
The lift coefficient depends on the geometry of the foil and the angle at which the foil meets the oncoming medium. The angle at which the water flows in direction of the wing is also called the „angle of attack“.

Figure 2 – Angle of attack
In a simplified way we can state that the bigger the angle of attack the bigger will be the lift coefficient. Well, that is not completely true because when we reach a certain angle of attack, the flow behavior abruptly changes.
When we plot the angle of attack against the lift coefficient at a fixed speed, we can see that at a certain level, the angle becomes too big which will result in a stall.
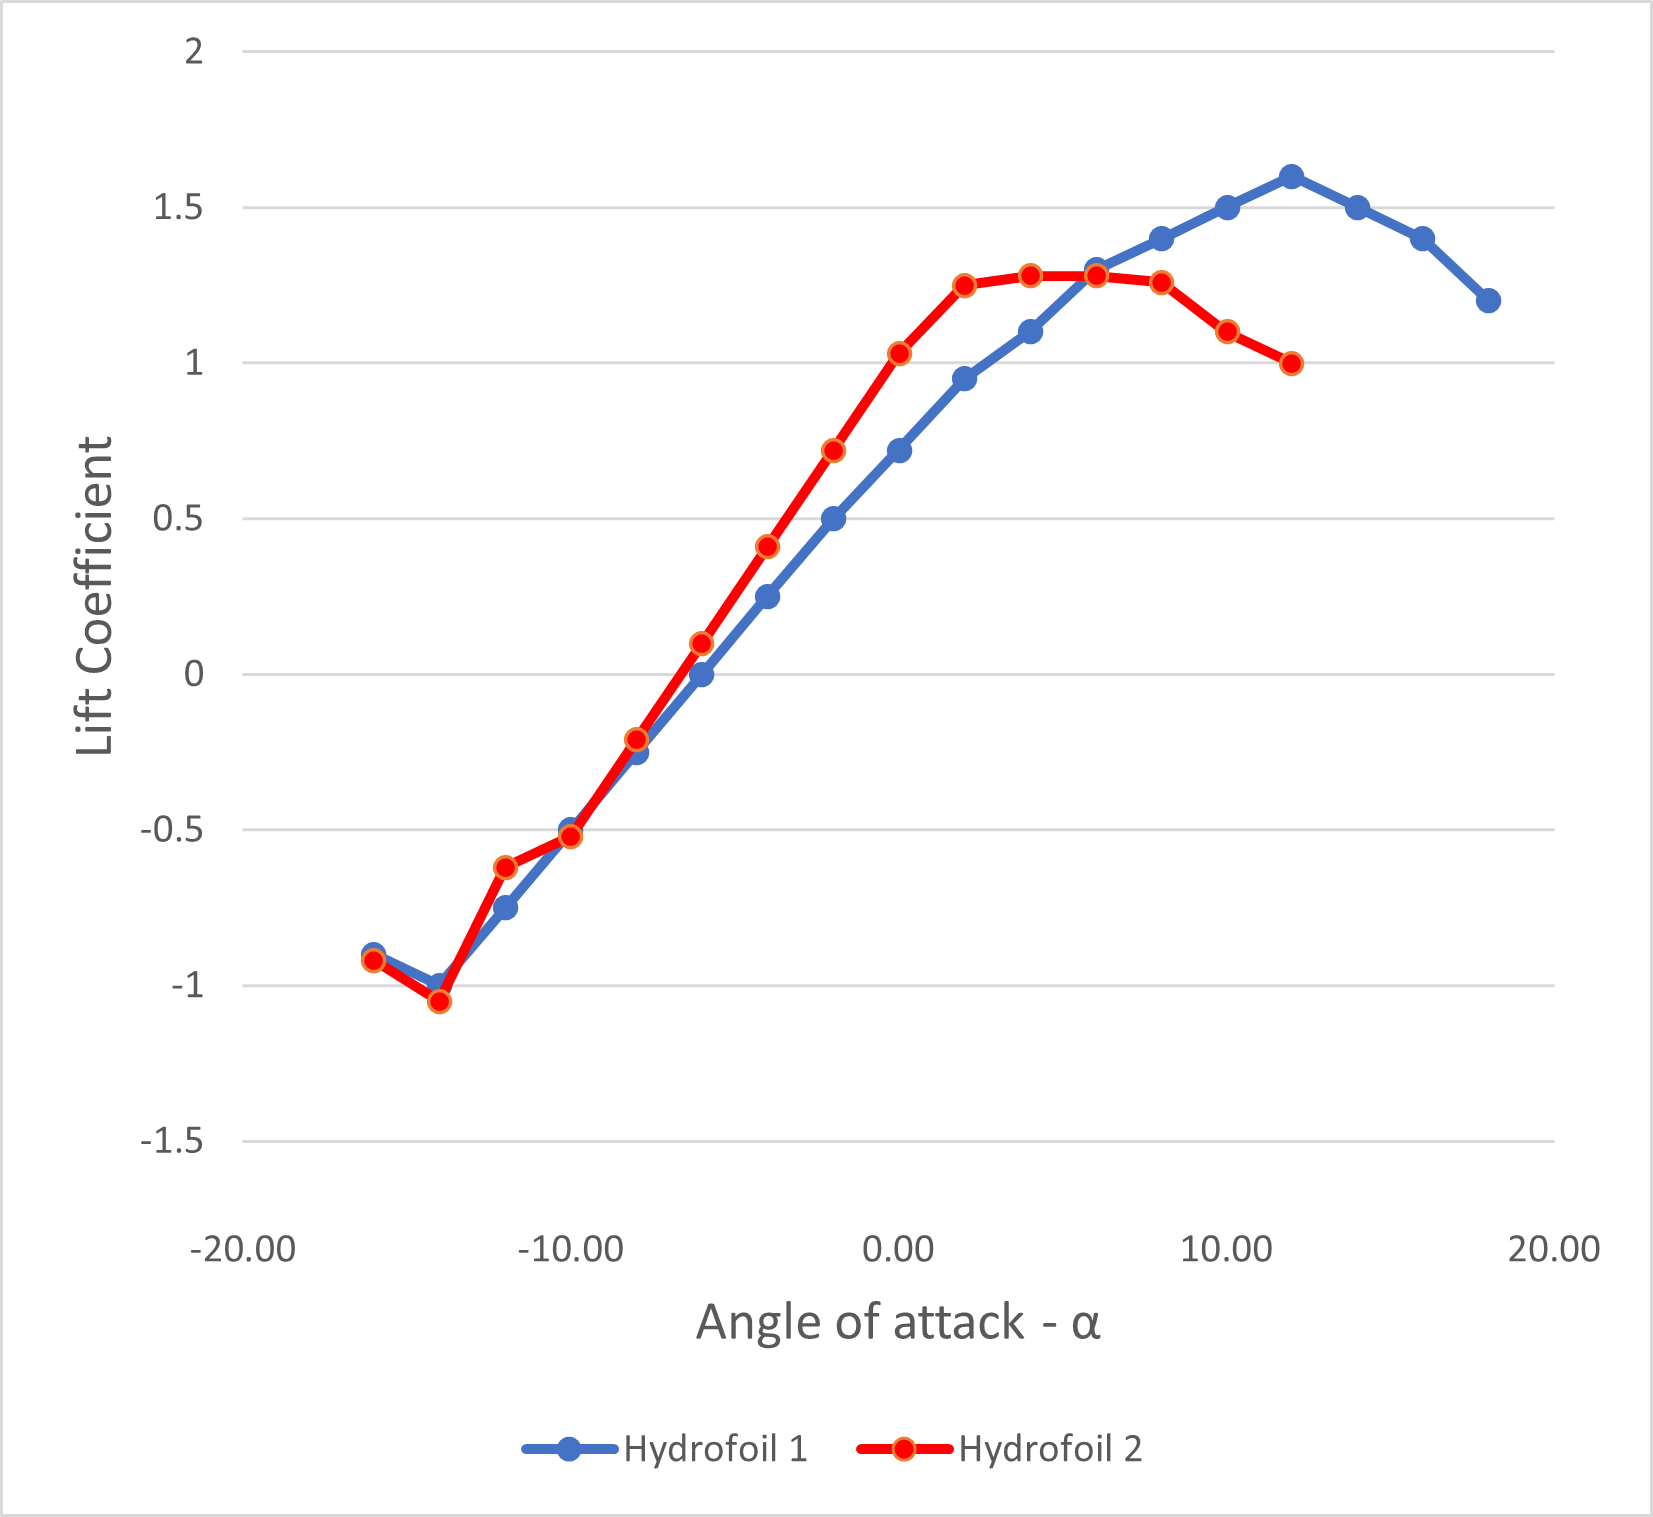
Figure 3 – Lift coefficient versus angle of attack
To explain shimming, we will not go more into details when exactly the angle of attack becomes to big and results in a stall. However, we have to understand that the angle of attack is having an influence on the lift force when talking about shimming. The reason for that is – and we will look later into that in more detail – that by adding a shim, you actually are going to change the angle of attack and with that, are changing the lift force.
Function of the Backwing
Actually you can apply a shim to the front- or backwing. However, most of the time shimming is applied to the backwing. Therefore, I will in the upcoming explanations focus on the backwing.
As you most probably know, the backwing has different functions. It provides stability – and therefore is also often called “Stabilizer” – provides control, counteracts the lift of the front wing and also damps the pitching moment of the foil.
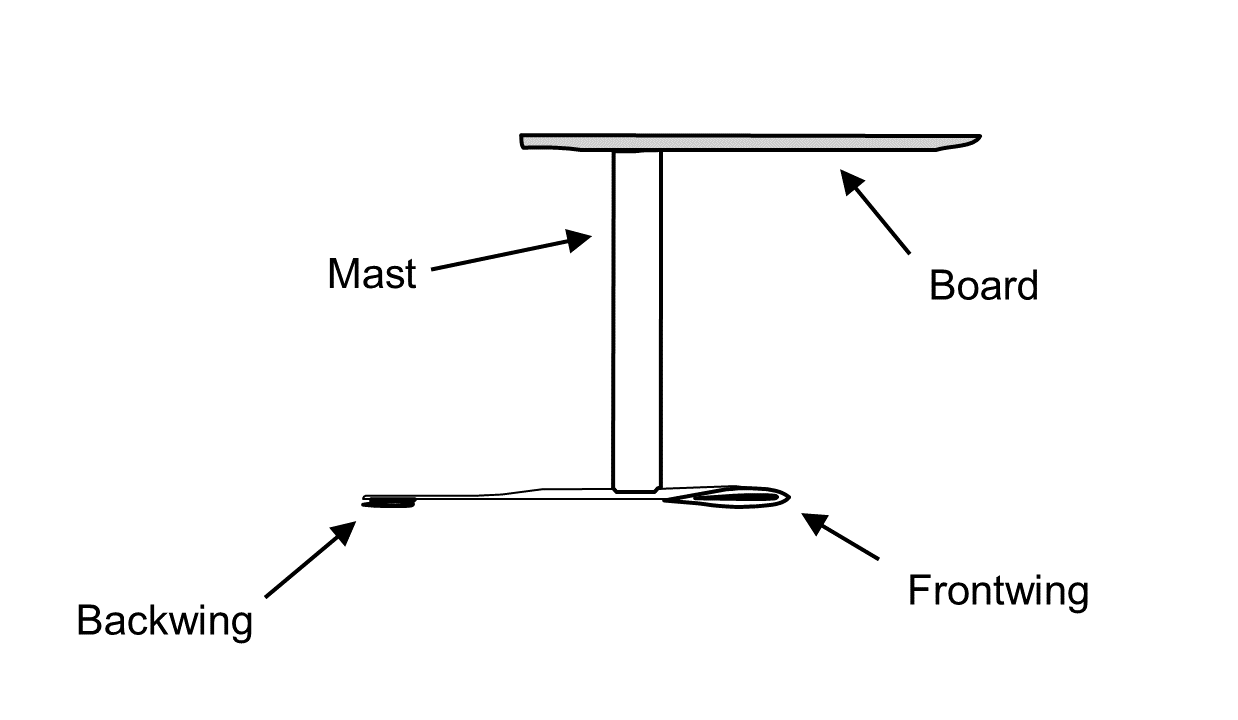
Figure 4 – Main parts of the pumfpoil setup
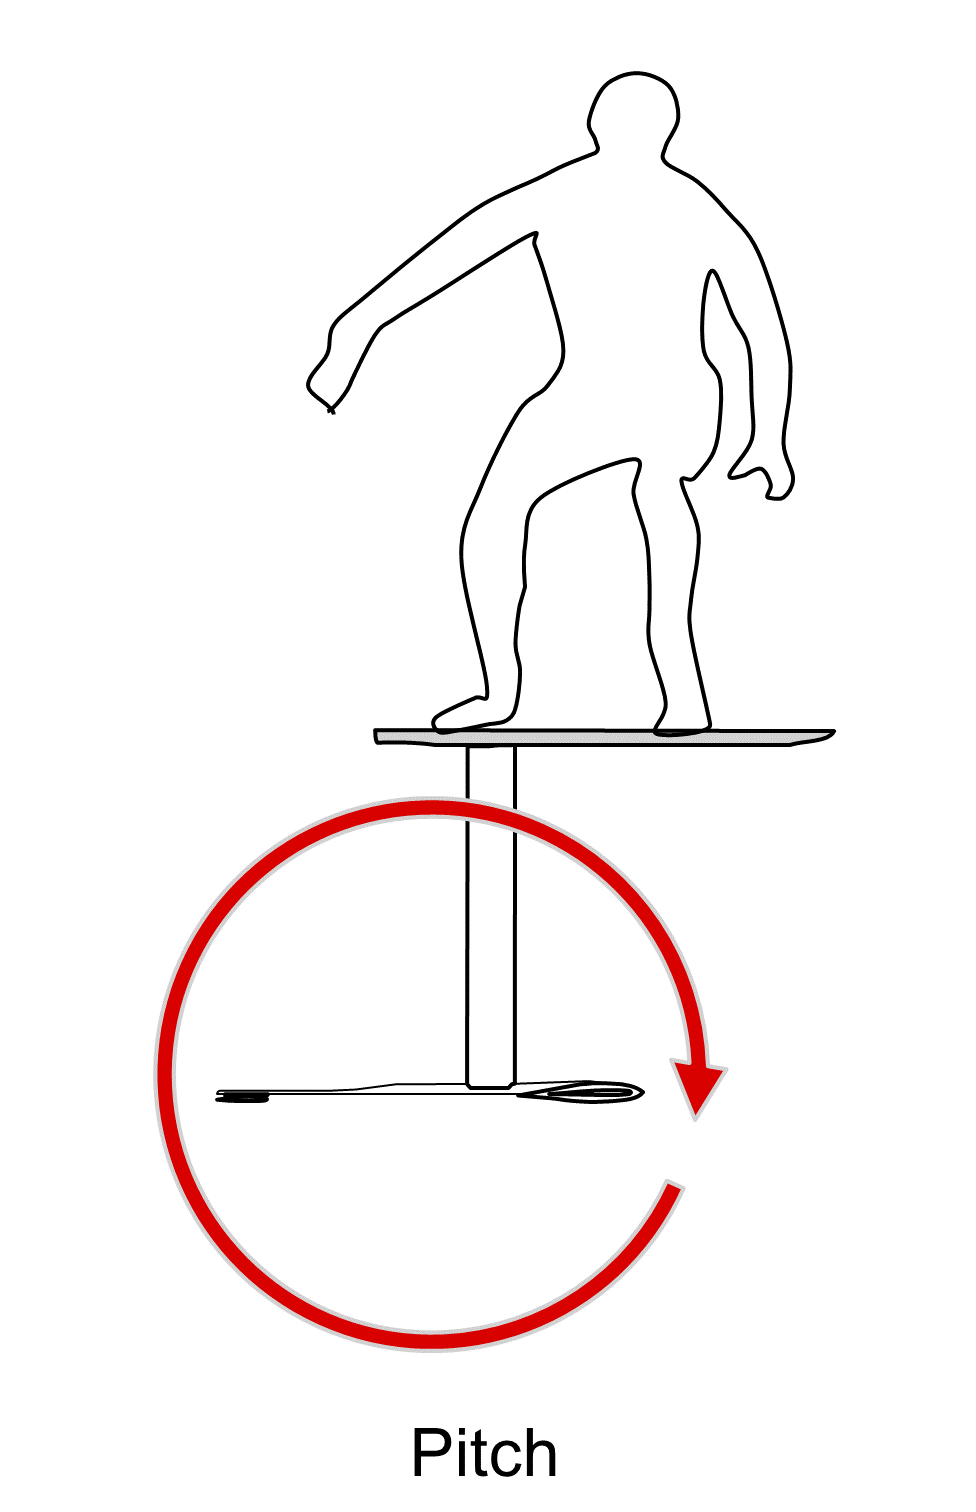
Figure 5 – Pitch direction
„Shimming“ – Changing the Angle of Attack
Looking at the main forces acting on the pumpfoil setup we know that the …
- frontwing generates a force pointing upwards, the lift force
- backwing generates a force pointing downwards
- foiler generates a force pointing downwards
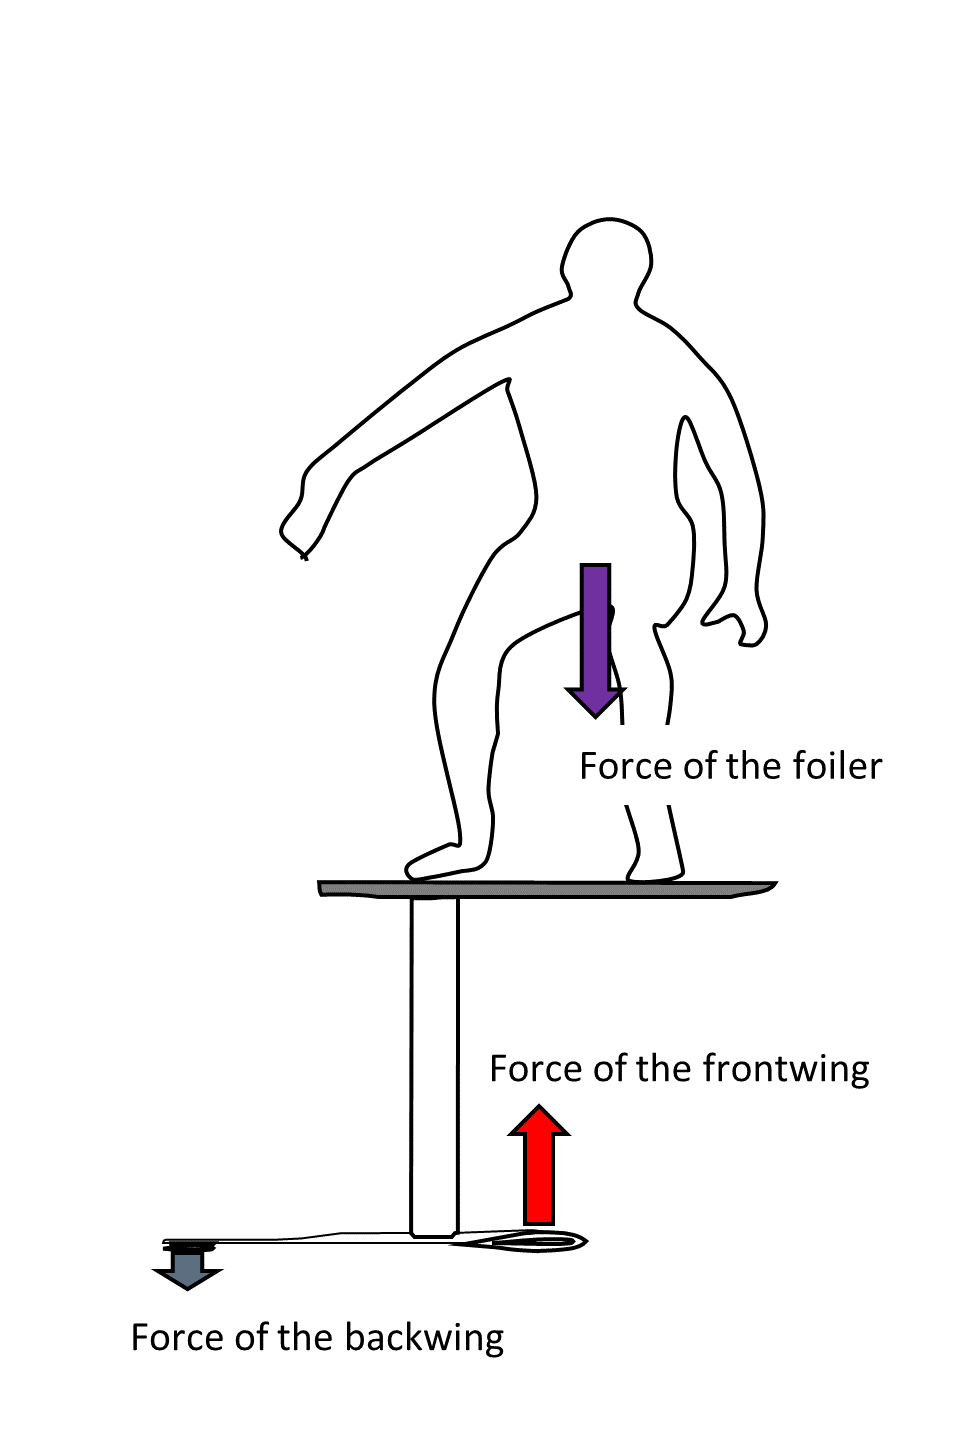
Figure 6 – Forces induced by the backwing, frontwing and the foiler
In the article „Pumpfoiling – Importance of the Body Position and Weight Distribution“ you can find a detailled explanation about the forces and moments acting when pumpfoiling. From there we know that the momentum theorem as well as sum of the forces is valid also for pumpfoiling. So wat happens now if we add a shim?
By inserting a shim between the fuselage and the backwing, we change the angle of attack of the backwing and with that the lift of the backwing. Due to the change of the force of the backwing, the resulting momentum along the pitch-axis is changed, which results in a different behaviour of the overall setup.
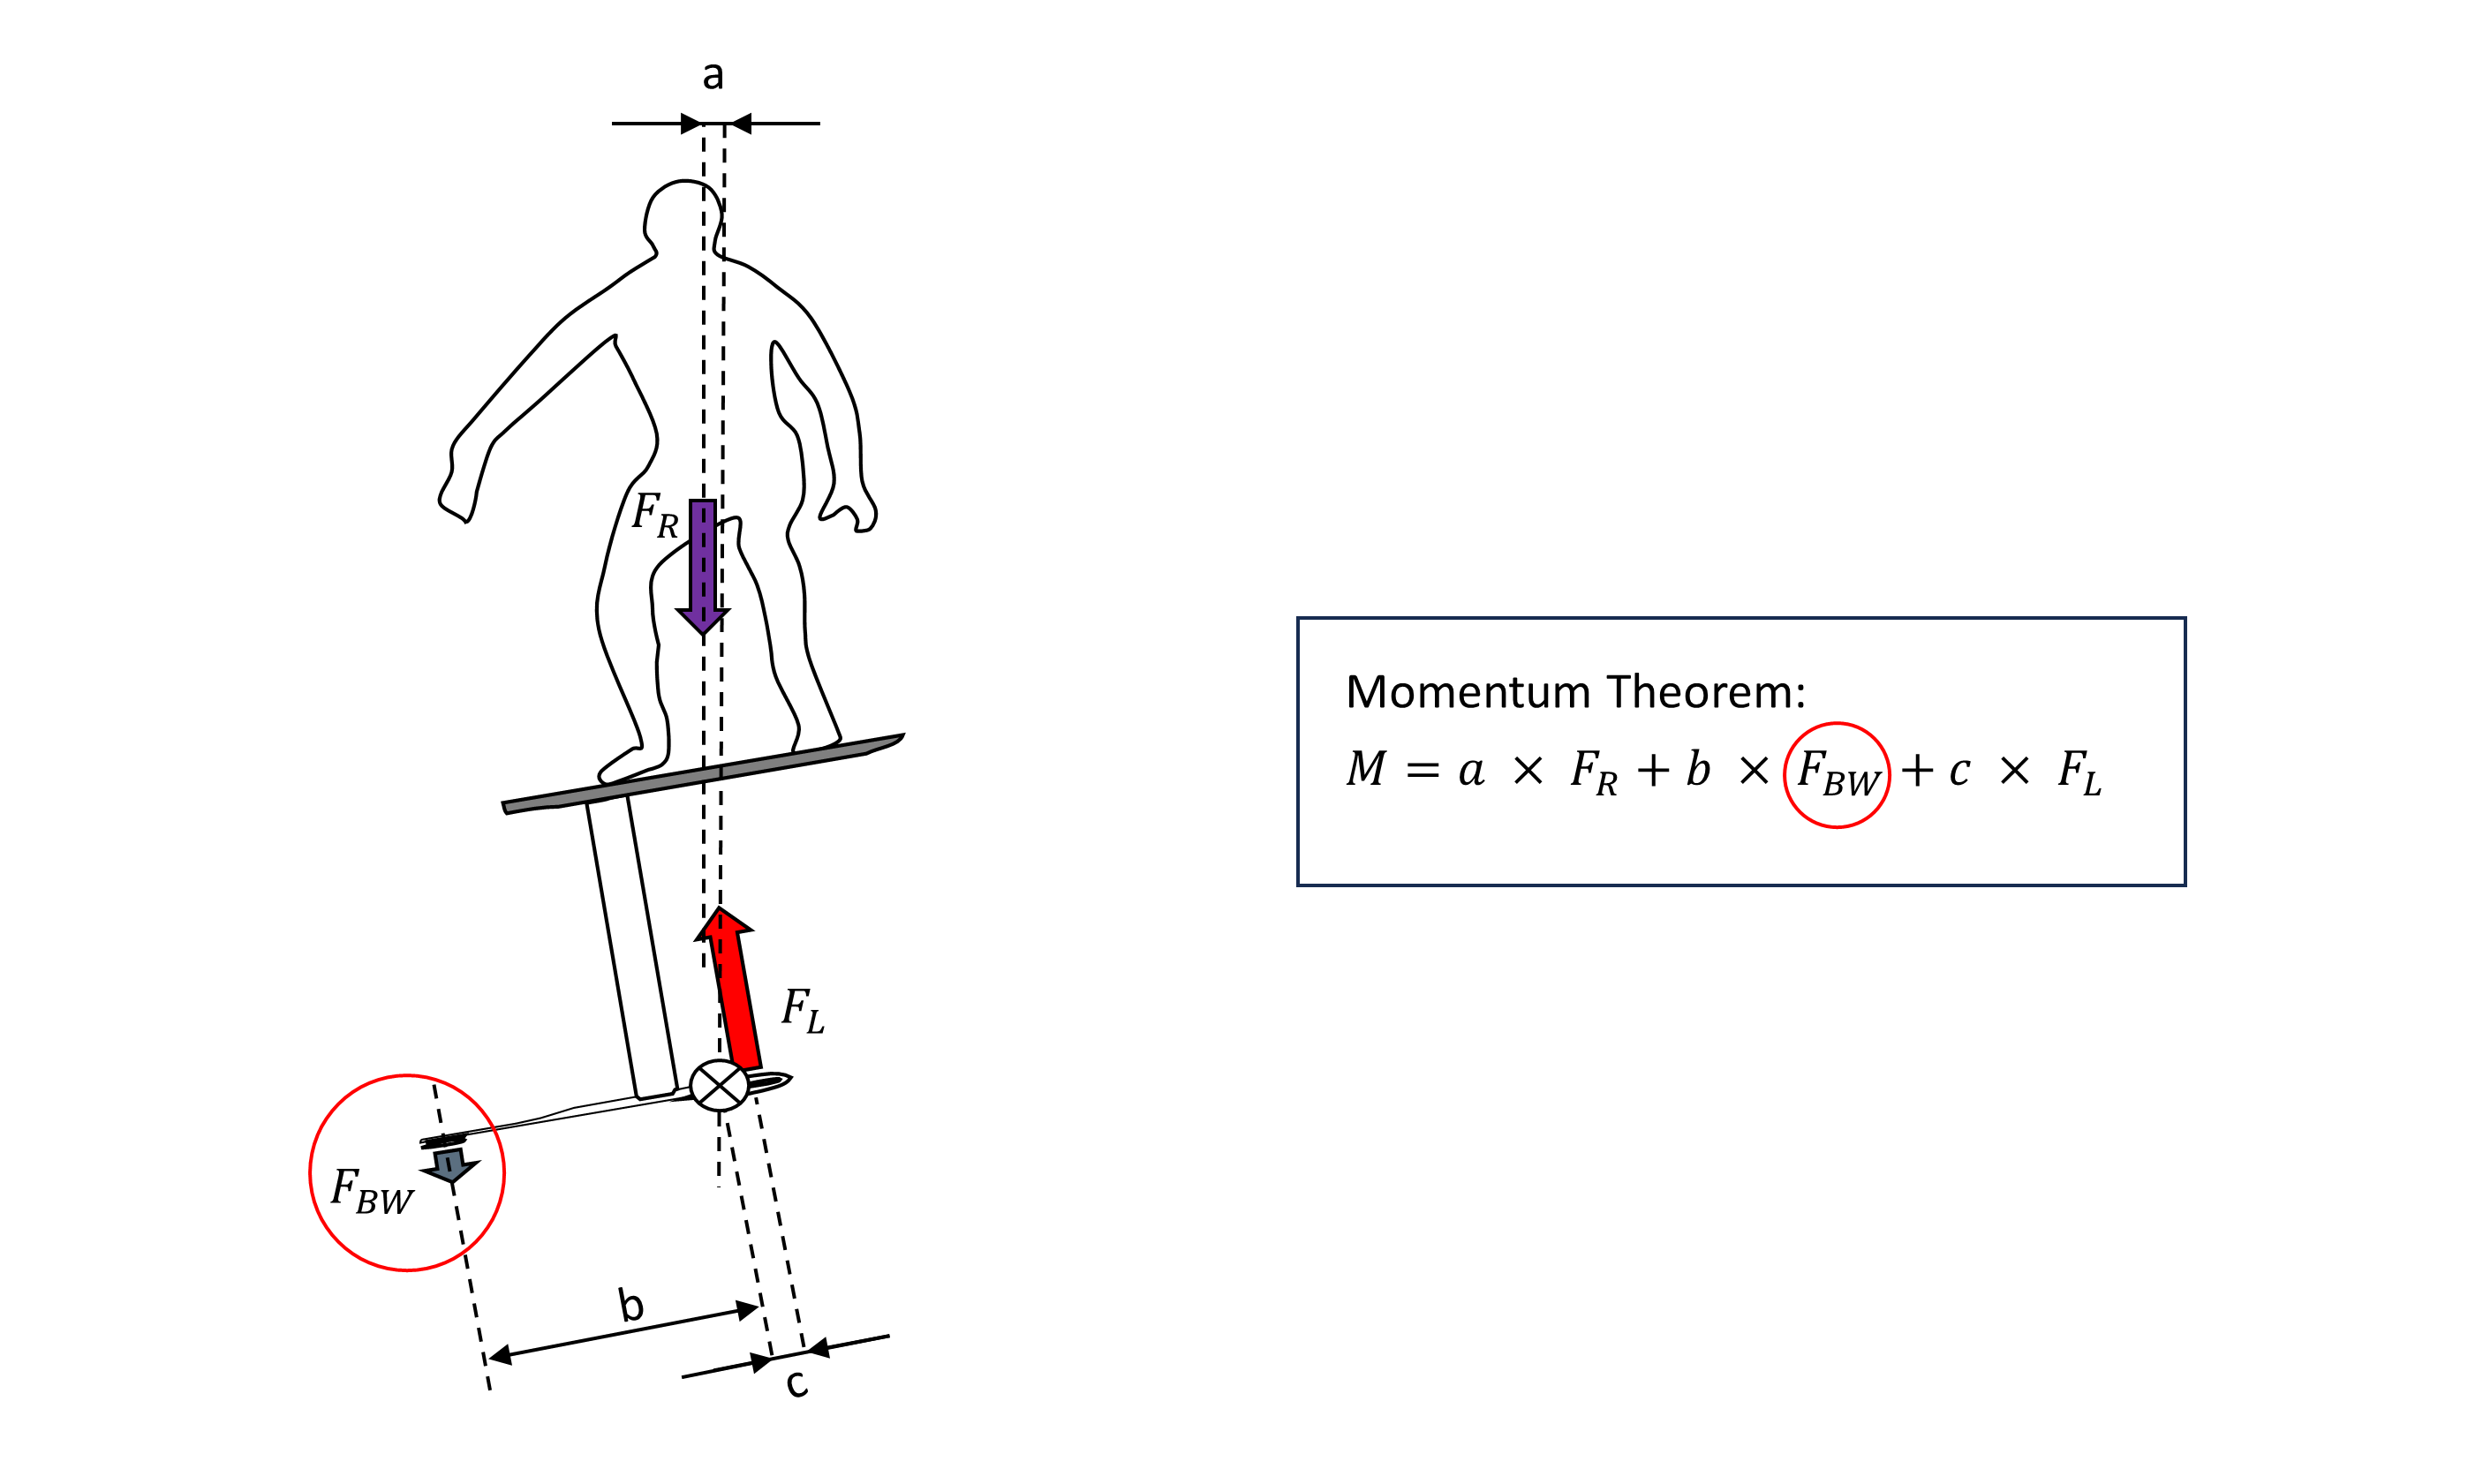
Figure 7 – Momentum theorem with impact of changing backwing force
When you look up shimming in the internet, you will sooner or later get confronted with the fact, that there are different ways how foiling setups are assembled. Although they look all similar, there are some specifics. What is relevant for us in the context of shimming the backwing is how or where the backwing is mounted on the fuselage. In some setups, the backwing is mounted on top of the fuselage, in some others underneath. Some setups also use a so called angle adaptor between the fuselage and the backwing.
Variant 1
- Backwing attached on top of the fuselage
- Backwing mounted using an angle adaptor
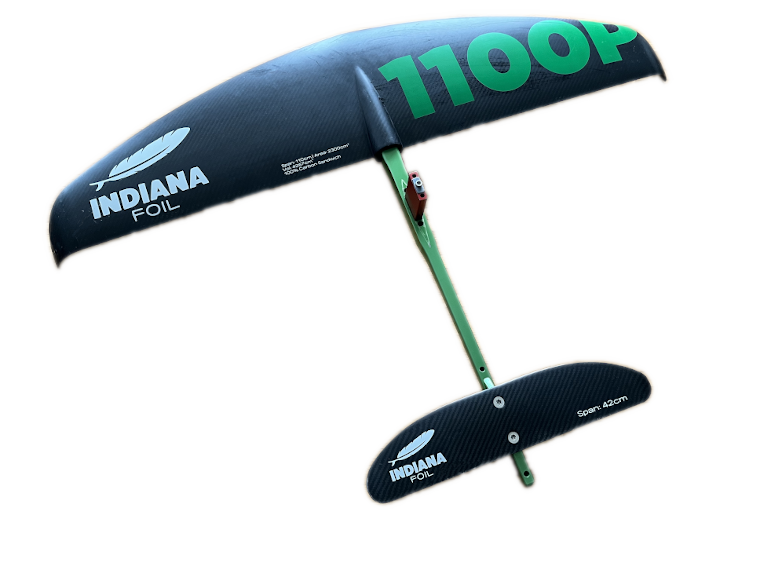

Variant 2
- Backwing attached underneath the fuselage
- Backwing mounted using an angle adaptor
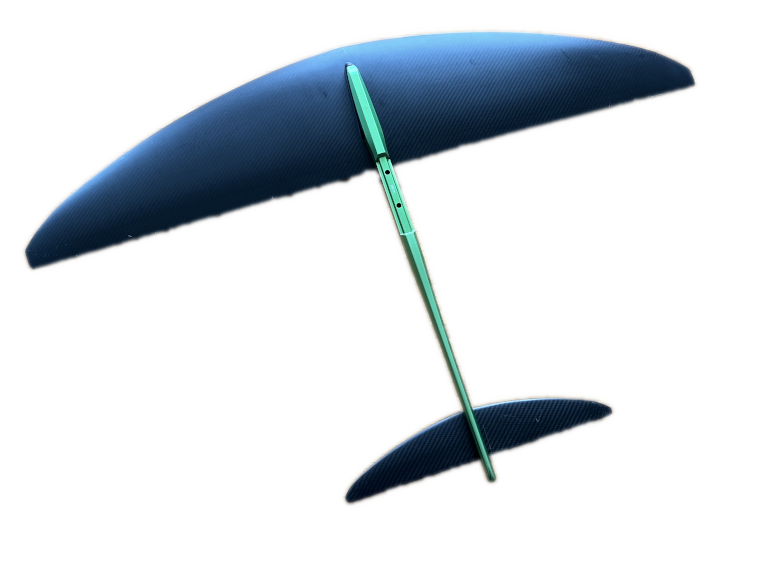

Variant 3
- Backwing attached underneath the fuselage
- Backwing mounted directly without angle adaptor to the fuselage


When you apply a shim at your foil, you must pay attention how your setup is assembled so that you will get the suitable shim for your intended purpose. A shim is basically a wedge that you put in between the fuselage and wing. So you will have to remove the wing and place the shim in between.

Figure 8 – Adding a shim in between the fuselage and backwing
Due to the shape of the shim – please note that there are positive and negative shims, we will look into that later – the angle in that the wing is mounted on the fuselage, will change. In this example, we are using a negative shim and you can see that the trailing edge of the wing is now pointing more upwards.

Figure 9 – In yellow position of the wing without shim, in black the position of the wing with a shim
If we bring that now back into the formula of the forces and moments, we can see the effect of the shim. Having added the shim the angle of attack of the backwing has increased. That results in a bigger force generated by the backwing and with that also in a bigger momentum induced by the backwing. Due to that change in the momentum, the foiler will feel more lift in front of the board.
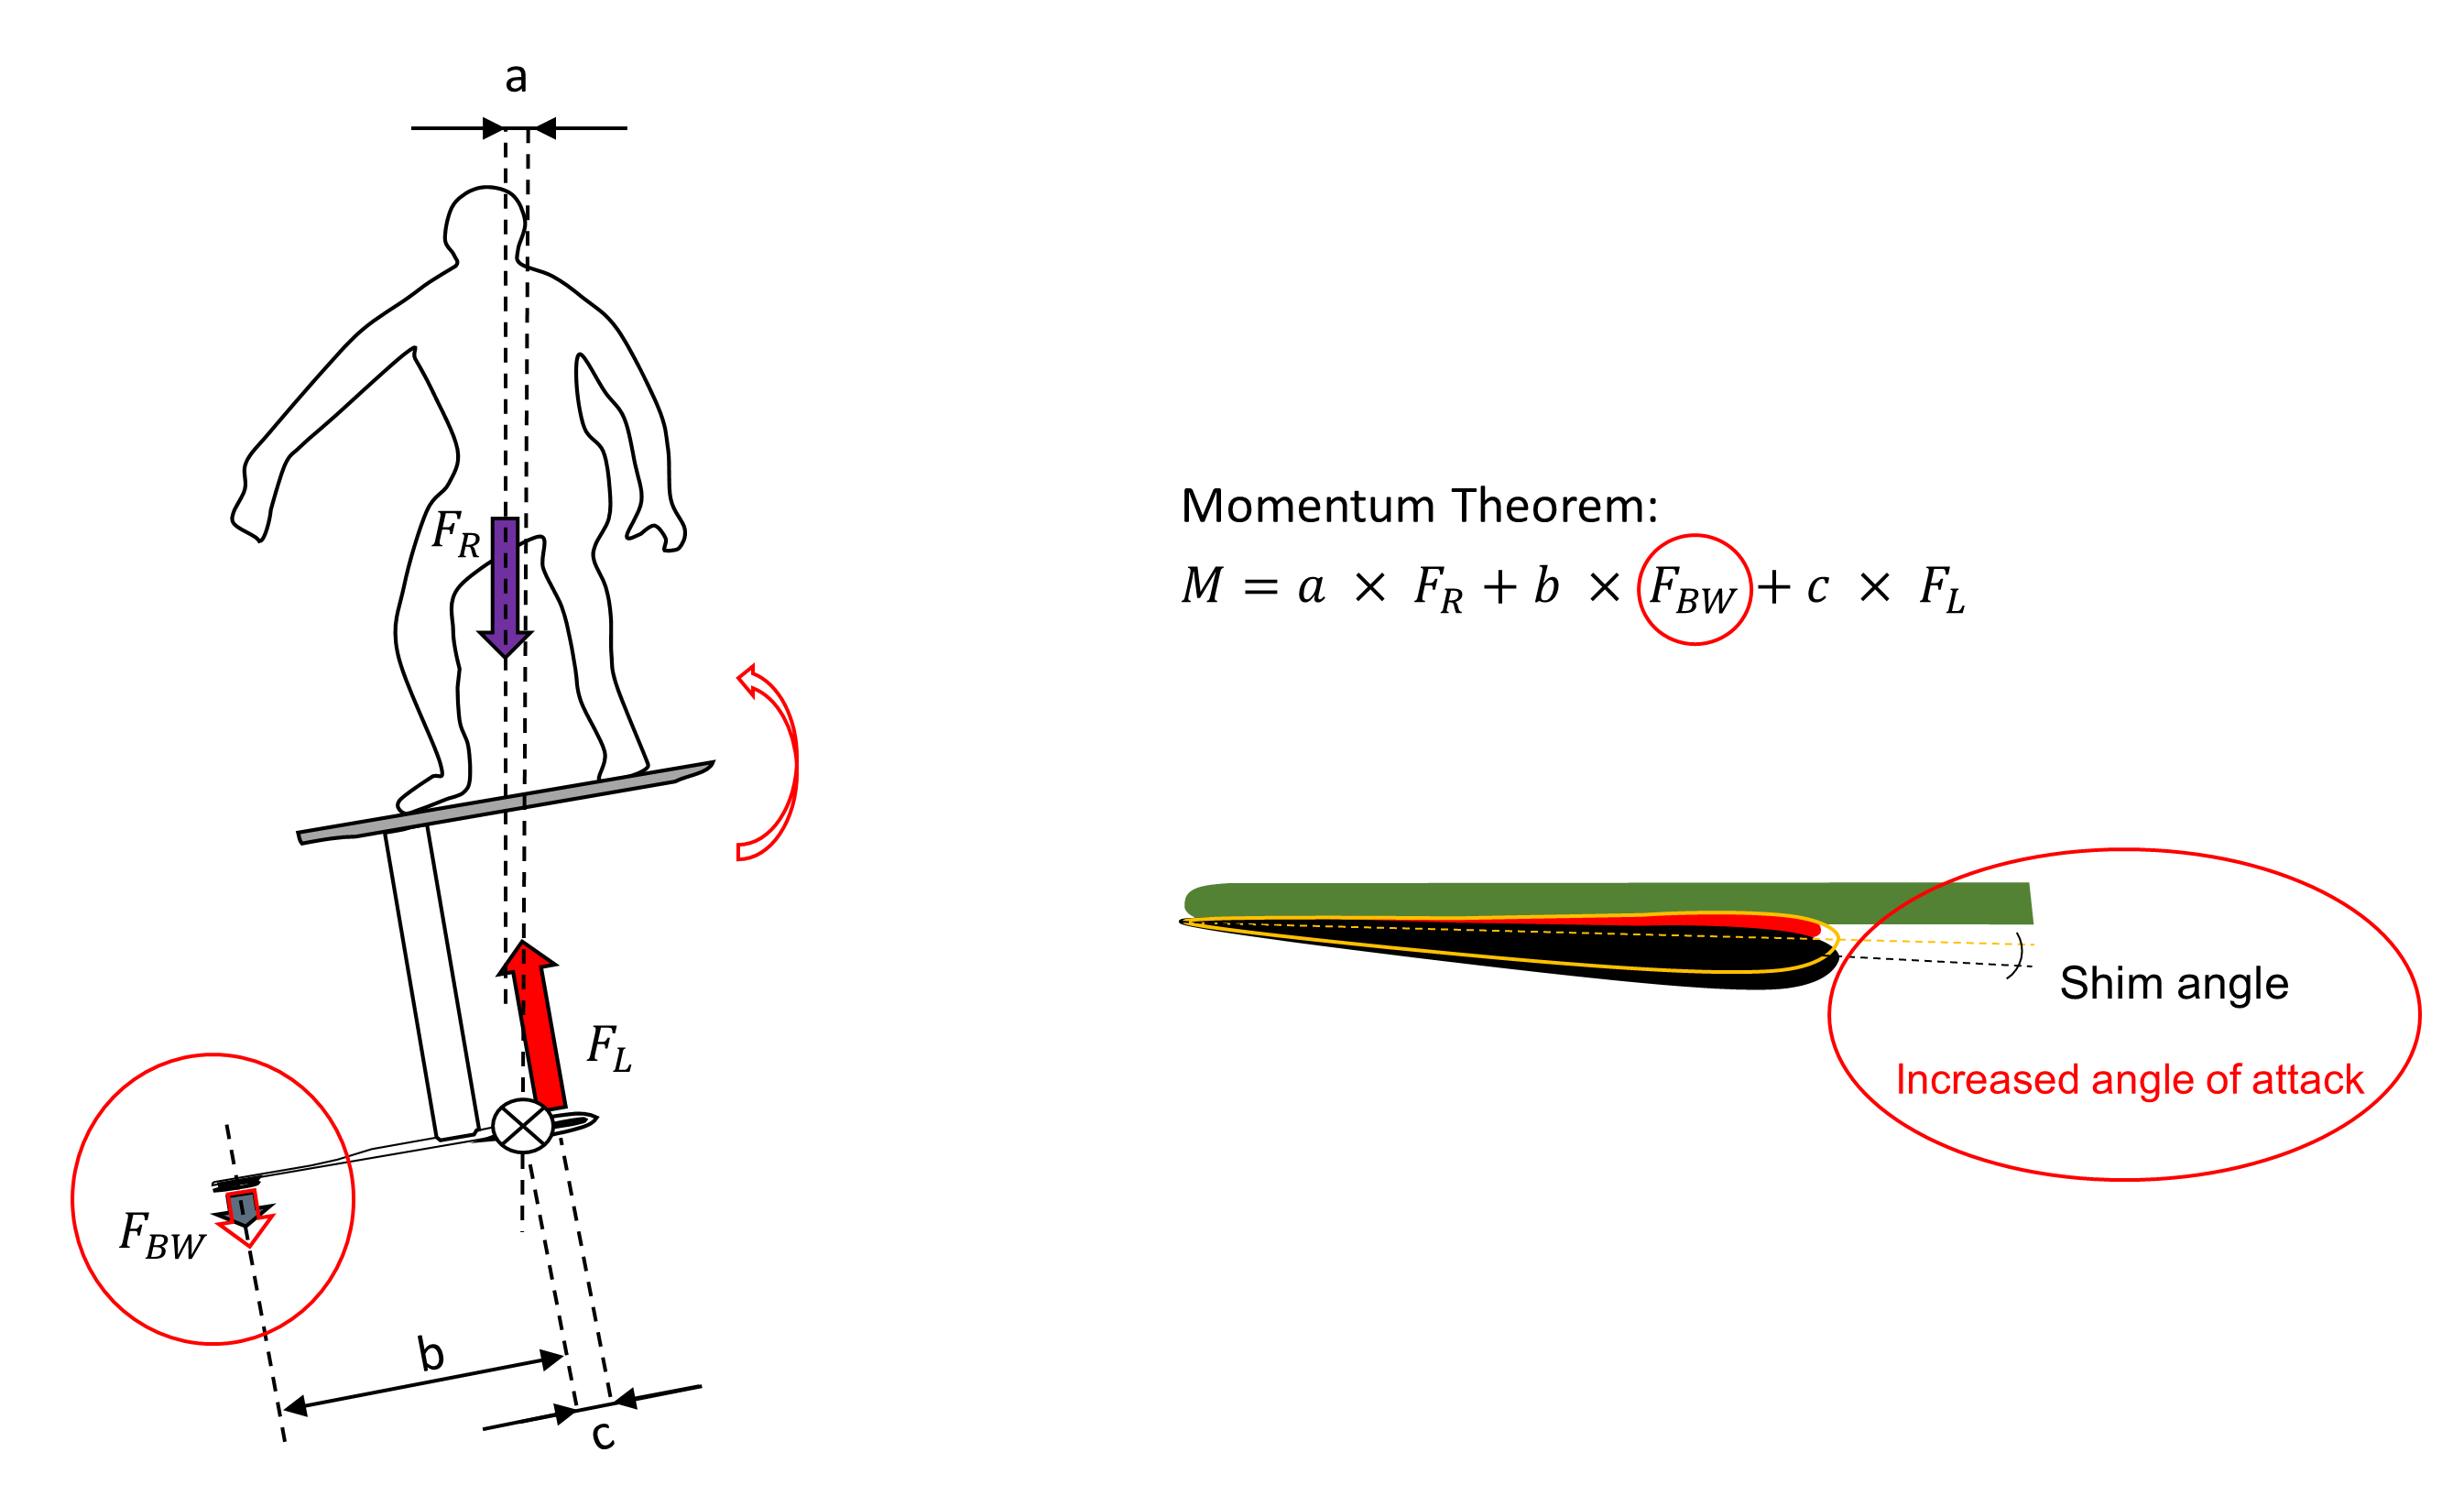
Figure 10 – Change in the momentum due to the change in the angle of attack of the backwing
As we can see, adding a shim between the fuselage and backwing has an influence on the overall system. Depending on in which direction you want to trim your setup, you can make use of negative of positive shims with different angles.
Impact of Negative and Positive Shims
To understand better how the shims are influencing the system, I put together a small overview that should help you to choose the correct shim.
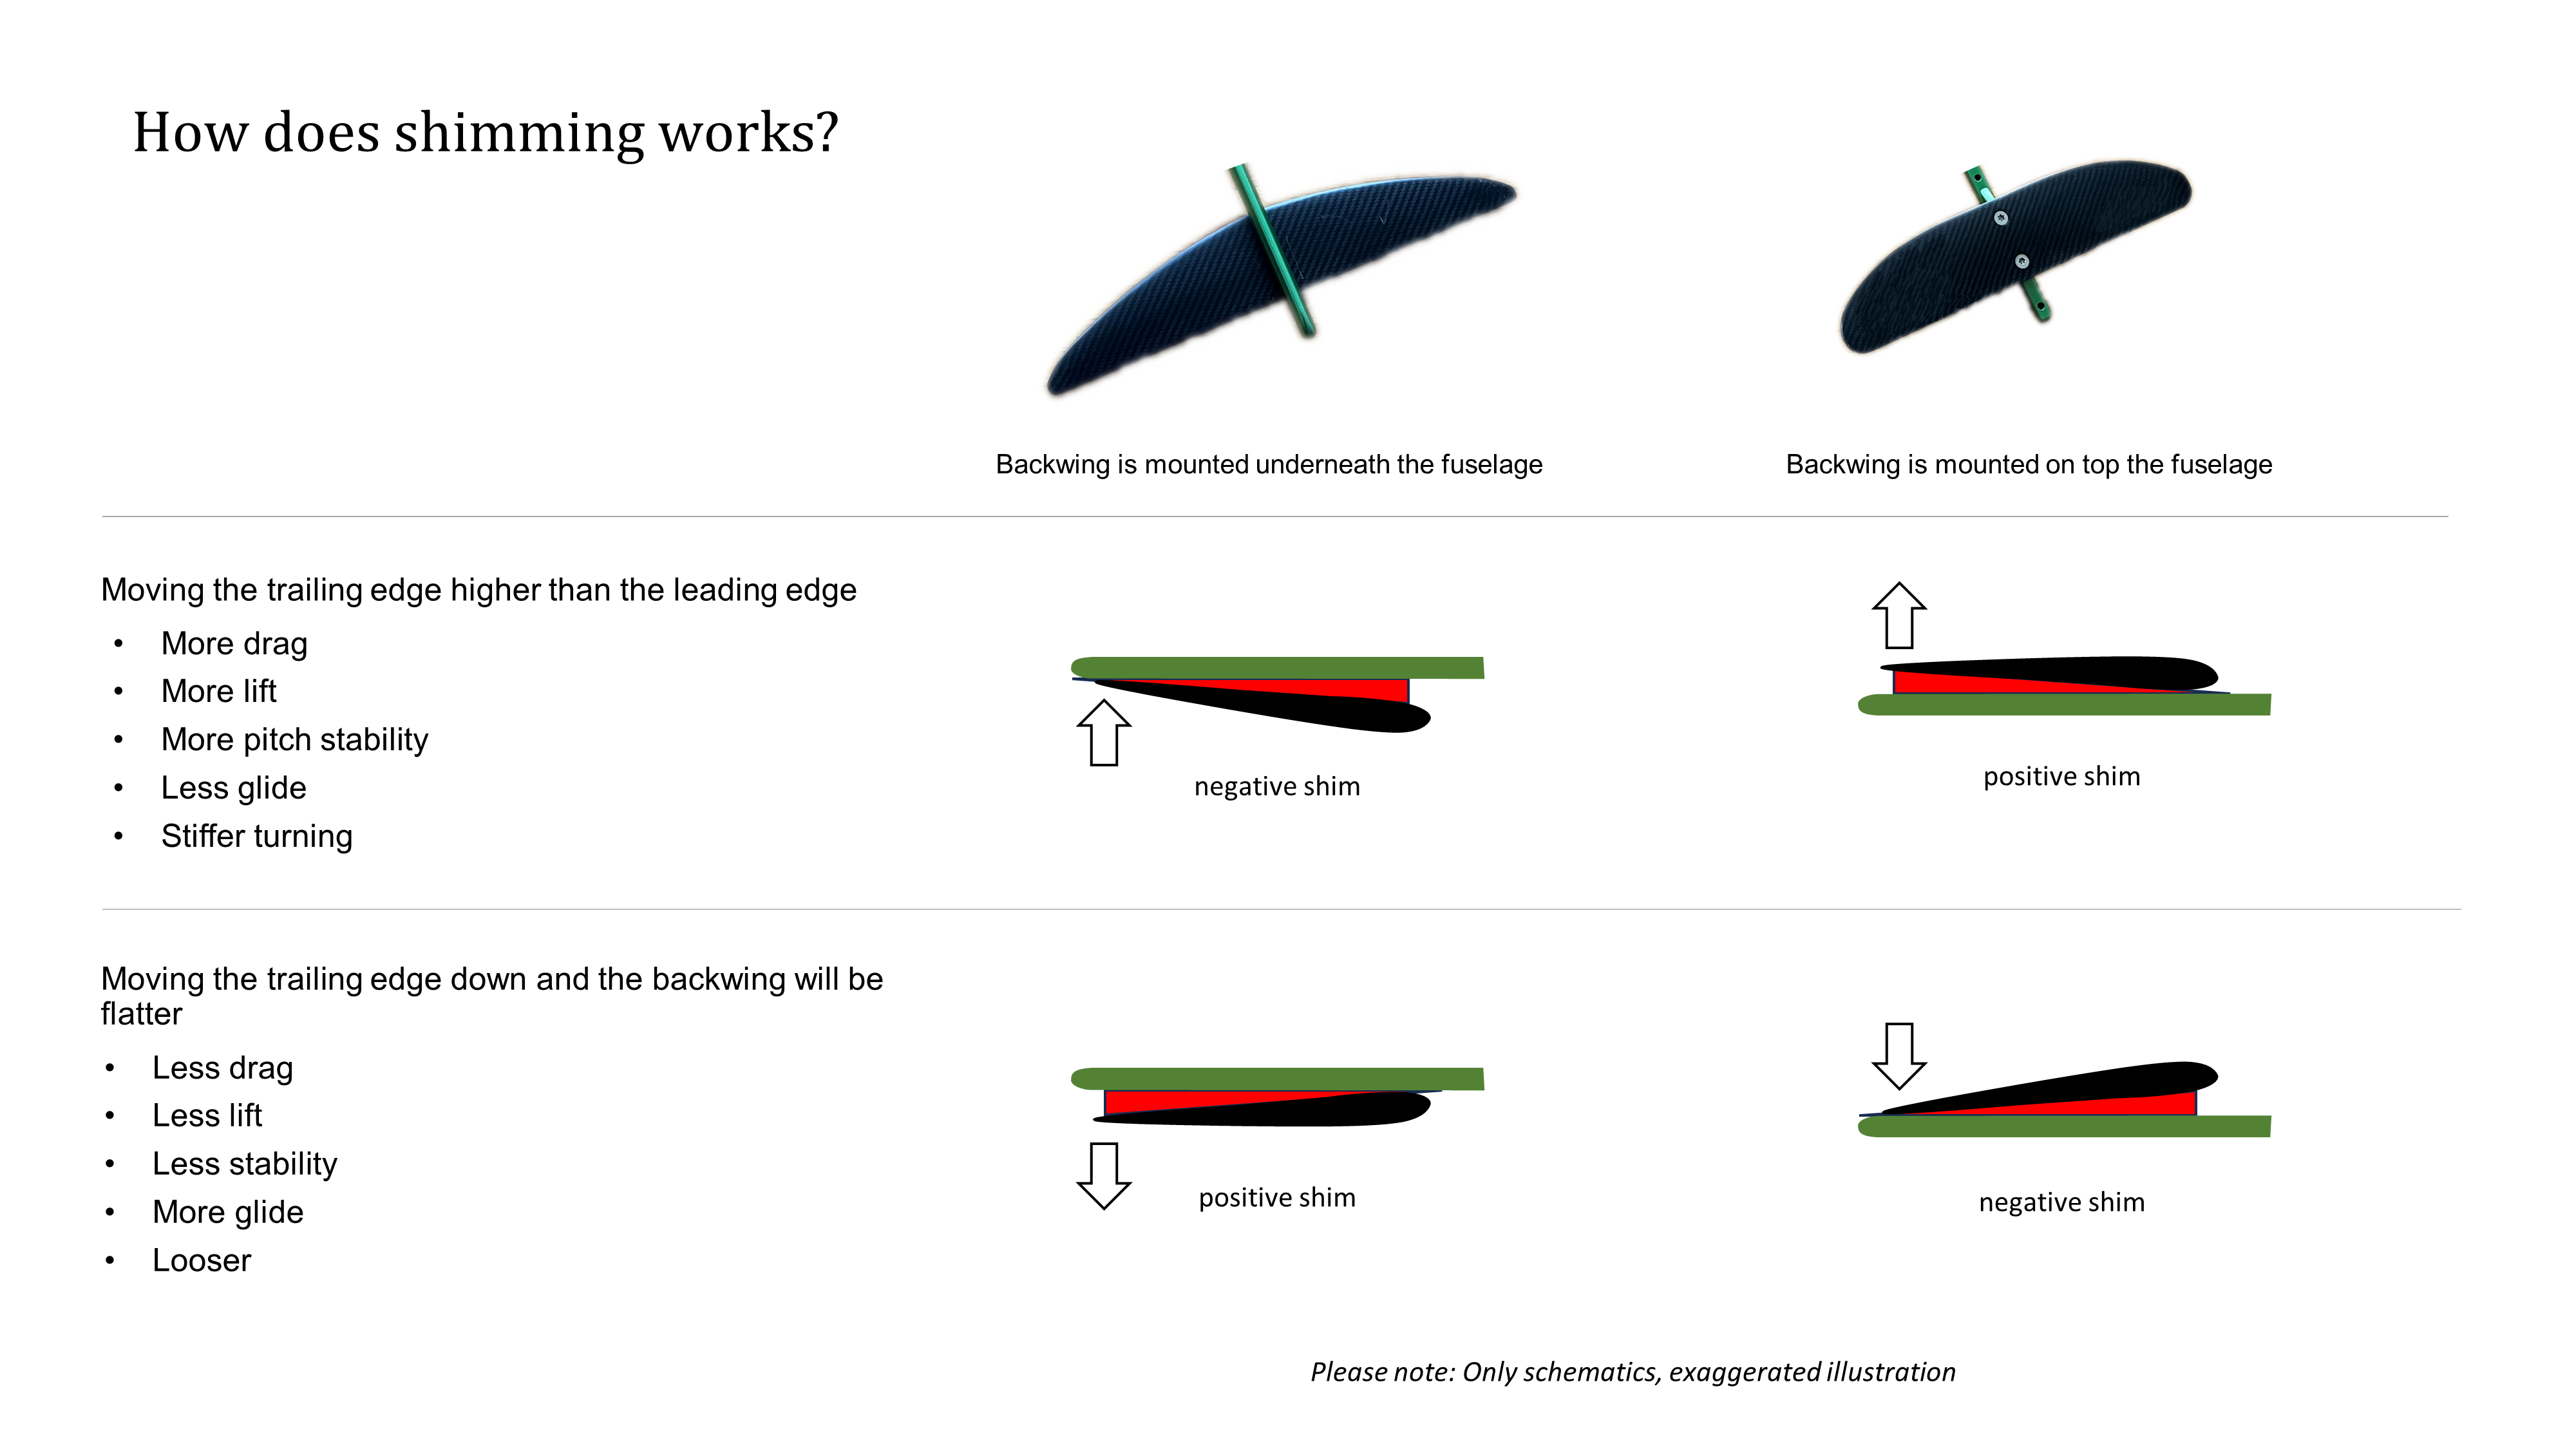
Table 1 – Overview negative and positive shims and their effects
As mentioned earlier, the first thing we have to distinguish if the backwing is mounted underneath or on top of the fuselage so that you can identify if you need a positive or negative shim. If you want to move the trailing edge of the backwing higher, what will result in:
- More drag
- More lift
- More pitch stability
- Less glide
- Stiffer turning
you will have to choose a so called negative shim in case that the backwing is mounted underneath the fuselage and a so called positive shim in case the backwing is mounted on top of the fuselage.
In case you want to move the trailing edge down to have a flatter positioned backwing, which will result in
- Less drag
- Less lift
- Less stability
- More glide
- Looser feeling
you have to choose a positive shim in case the backwing is mounted underneath the fuselage and a negative shim in case the backwing is mounted on top of the fuselage.
Please note that illustrations here are used to indicate the direction and are exaggerated. Not all setups have in the so called neutral position (without a shim) the same angle and therefore, the shim is always changing to a new angle from the position without a shim – which does not has to be zero.
Earlier I also mentioned that some brands are using angle adaptors between the fuselage and the backwing. For sure, also for those setups you can work with shims, however many of the brands who designed the setup with an angle adaptor also offer angle adaptors with different angles of attack, so that you can just replace the angle adaptor with a different angle.
Conclusions
By adding a shim, you are changing the angle of attack of the backwing and with that its lift force. With that you can influence the pitch moment of the foil, which is going along with impact on the glide, stablility and agility on the turns.
Dependent on your setup, you have to be aware to choose the correct shim (either negative or positive) to achieve the desired result.

